MicroZed Chronicles: Introducing the MicroBlaze Risc-V
- Adam Taylor

- Jun 5, 2024
- 4 min read
Updated: Jun 25, 2025
One of the things I have been very excited about recently is the MicroBlaze RISC-V or MicroBlaze V as it will be known. The MicroBlaze V is a based upon the very popular RISC-V Instruction Set Architecture (ISA), offering developers a 32 bit implementation (RV32I) with support for a number of extensions:
M – Multiplication and Division
A – Atomic Instructions
F – Floating Point Instructions
C – Code Compression
Zba, Zbb, Zbc, Zbs – Bit manipulation
This provides us with a processor solution which like the original MicroBlaze is simple to use and scalable for a range of applications. Currently we are able to implement MicroBlaze V in the microcontroller configuration with the real time and application processor on the development road map.
Of course while the MicroBlaze V brings many benefits including a wider ecosystem of libraires, higher performance and code compression, implementing the MicroBlaze V is identical to a traditional MicroBlaze system.
Within the AMD Vivado library you will notice there are several new components associated with the RISC-V. The most obvious of these is the MicroBlaze V processor core, to enable us to debug our applications there is also a new MicroBlaze Debug Module V which implements the debugging protocols required for to support the RISC-V architecture.
We are also provided with a MicroBlaze V MCS, this is the tightly integrated MicroBlaze V MicroController System and provides developers with a very compact Microcontroller System, with fixed interfacing capabilities. We will take a more in depth look at the MicroBlaze V MCS in a separate blog soon.

In the remainder of this blog we are going to create a MicroBlaze V system and how we can create one effortlessly targeting the Digilent Arty S7-50. As this is the first time we have done this there is also a full video walk through at the bottom of this blog to help you see exactly the stages.
The first thing we need to do is create an new project targeting the Arty S7-50 and once the project is created open a new block diagram.
Once that is completed we are going to add a to the design the DDR3 SDRAM from the boards tab.

Delete the clock ports and reconfigure the MIG to have the following parameters
XADC Instantiated
System Clock 200 MHz
No buffer on the system clock input
Revalidate the pin out and save the MIG configuration, the next step is to add on the MicroBlaze V processor.

Run the block automation – select the microcontroller configuration and set the local memory size to 32 KB and select the lower of the two clocks coming from the DDR MIG to clock the MicroBlaze. Ensure the debug option is enabled and run the block automation.

From the boards tab pull across the USB Uart and re customise the MicroBlaze V processor on the 5th page enable the AXI Instruction peripheral interface.

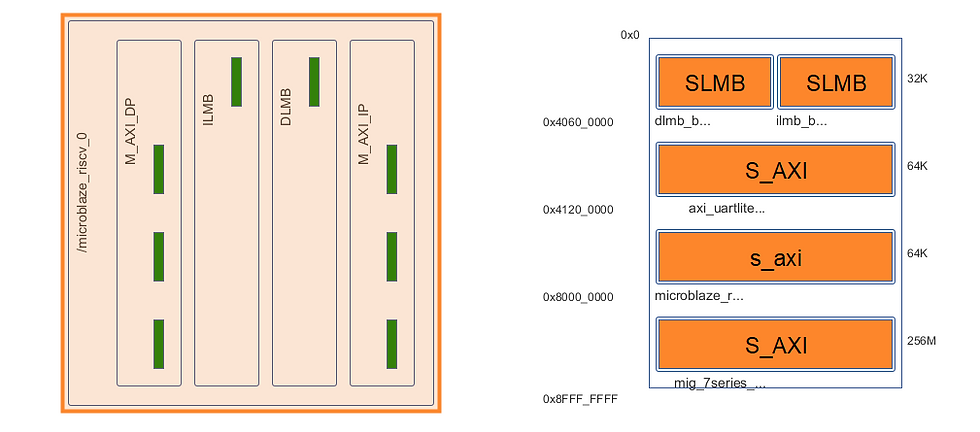
Run the connection automation for all of the AXI connections.

This will create the AXI network as shown below for both the instruction and data address.

Re customise the interrupt concat block to have one input, and connect the USB UART interrupt to the concat clock.

The final step is to add in a clocking wizard and configure it as below
Clock output 200 MHz
No reset input

Connect the output of the clocking wizard to the DDR MIG clock inputs and the locked signal to its reset input.

Make the clock input external, create a new XDC (or copy the one below), run implementation and bit stream generation.
We also need to make the reset external,
set_property PACKAGE_PIN F14 [get_ports clk_in1_0]set_property IOSTANDARD LVCMOS33 [get_ports clk_in1_0]
With the bit stream completed, we are able to then export the XSA and create a new Platform and application using Vitis.
To get started with the creation of the platform we can use the exported XSA.

This will create us a new Embedded Platform targeting the MicroBlaze V

With the platform established, we are able to create the hello world example application and build the binary for both the combined application and binary.

We can then debug the application on the Arty S7 and see the HART stopped at the program entry.

Running this and observing the output in a terminal window shows the application running as we would expect.

Like I said in the beginning, the MicroBlaze V flow is identical to previous MicroBlaze applications, although it does as I said bring several advantages.
The video below provides a step by step guide.
Going forwards we will be using the MicroBlaze V whenever we need to MicroBlaze Controller in our application so we will be looking at it and its capabilities a lot more!
Workshops and Webinars
If you enjoyed the blog why not take a look at the free webinars, workshops and training courses we have created over the years. Highlights include
Professional PYNQ Learn how to use PYNQ in your developments
Introduction to Vivado learn how to use AMD Vivado
Ultra96, MiniZed & ZU1 three day course looking at HW, SW and PetaLinux
Arty Z7-20 Class looking at HW, SW and PetaLinux
Mastering MicroBlaze learn how to create MicroBlaze solutions
HLS Hero Workshop learn how to create High Level Synthesis based solutions
Perfecting Petalinux learn how to create and work with PetaLinux OS
Embedded System Book
Do you want to know more about designing embedded systems from scratch? Check out our book on creating embedded systems. This book will walk you through all the stages of requirements, architecture, component selection, schematics, layout, and FPGA / software design. We designed and manufactured the board at the heart of the book! The schematics and layout are available in Altium here Learn more about the board (see previous blogs on Bring up, DDR validation, USB, Sensors) and view the schematics here.
Sponsored by AMD


