
MicroZed Chronicles: Back to Basics, Getting Started with 2025.1
- Jun 10, 2025
- 4 min read
It has been a while since we looked at going back to basics and getting started with a simple design in Vivado and Vitis. As the last time we looked at this was when I started hosting this blog on my own site back in 2020, then we used Vivado 2020.1 and a MicroZed board.
For this blog we are going to take a look at how we can get started with the newly released Vivado 2025.1 and the Avnet ZUBoard which provides us with a Zynq UltraScale+ MPSoC.
To get started the first thing we are going to do is open Vivado 2025.1

Select create project to open the project creation wizard.

On the next page select the project name and location the project will be saved to on your system.

Click next and select RTL project and leave the define sources box checked

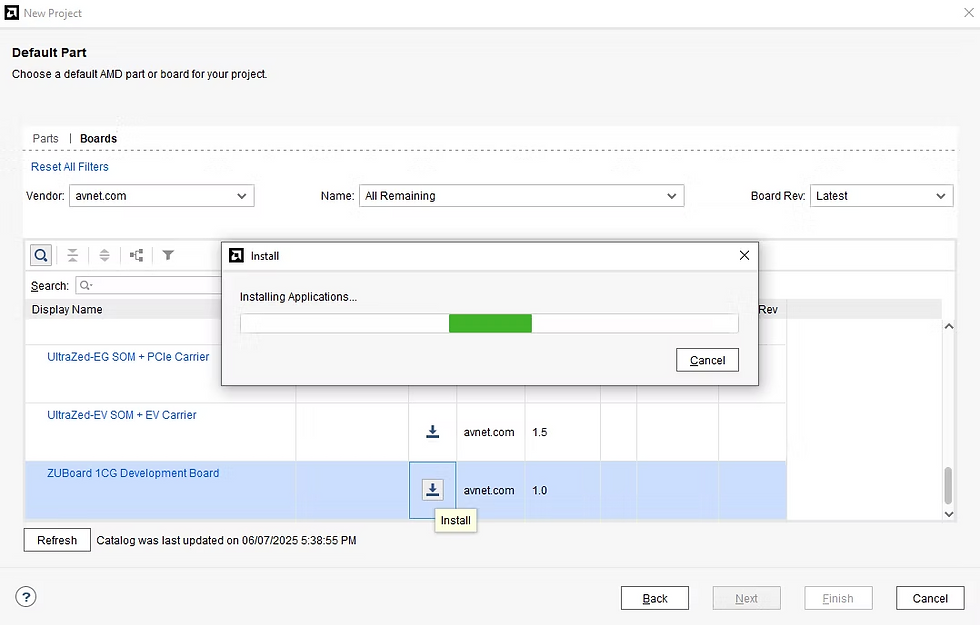
Click next and the device / board selection box will open. Click on board and you will see several supported boards. The ZUBoard is not included so we need to click on refresh to fetch a wider selection of boards from the AMD GitHub.


Once the boards have been refreshed, from the Avnet drop down you will see the ZUBoard. It is not yet installed however, click on the download arrow to download the ZUBoard.

With the ZUBoard is downloaded we can select the board and complete the project creation wizard.


The completion of the project creation wizard will open the project in Vivado. Select the create Create Block Design Option and enter a name for the block design.


This will open a IP Integrator canvas into which we can add IP blocks to define the functionality.

Click on the + symbol to bring up the IP Library and type in Zynq, select the Zynq UltraScale+ MPSOC block. This will add a block which defines the processing system of the Zynq UltraScale+ MPSOC.
However, it is not yet configured for the ZUBoard, the block needs to know the interfaces, clocking and most importantly the DDR4 Memory configurations.


We can do this by running the block automation, click OK to apply the board pre-sets.

This will update the Processing System to reflect the correct ZUBoard configuration, it will also enable interfaces from the PS to the PL where the PS is the master.

The next thing to do is from the board tab in Vivado, drag across one of the RGB Leds, this will implement a AXI GPIO connection to the LEDs. As this is defined within the boards tab we do not need to worry about IO constraints they are incuded in the board defintion for this interface.

The next step is to run the connection automation to connect the Processing System AXI masters to the AXI GPIO slave interface. This also connects clocks and resets.


Connect the second AXI Clock interface on the Processing System block.

We can also change the view of the IP Integrator block diagram, this helps us understand and visualise the design. E.g. Addressing View, AXI Lite View, and clocking and reset view.


The final step is to create the RTL wrapper from the design, right click on the IP Integrator symbol and select Create HDL wrapper. This wrapper will be created in either VHDL or Verilog depending on the project settings.

Let Vivado manage the top level

Once completed click on the build bitstream and wait for the writing of the bitstream to be completed.

When the bitstream is completed, we can export the XSA which contains the bitstream and information on the processor configuration and peripherals connected to the AXI network in a number of formats.

We are now ready to take a look at creating a basic application for the processor cores.
UK FPGA Conference
FPGA Horizons - October 7th 2025 - THE FPGA Conference, find out more here.
Workshops and Webinars:
If you enjoyed the blog why not take a look at the free webinars, workshops and training courses we have created over the years. Highlights include:
Upcoming Webinars Timing, RTL Creation, FPGA Math and Mixed Signal
Professional PYNQ Learn how to use PYNQ in your developments
Introduction to Vivado learn how to use AMD Vivado
Ultra96, MiniZed & ZU1 three day course looking at HW, SW and PetaLinux
Arty Z7-20 Class looking at HW, SW and PetaLinux
Mastering MicroBlaze learn how to create MicroBlaze solutions
HLS Hero Workshop learn how to create High Level Synthesis based solutions
Perfecting Petalinux learn how to create and work with PetaLinux OS
Boards
Get an Adiuvo development board:
Embedded System Book
Do you want to know more about designing embedded systems from scratch? Check out our book on creating embedded systems. This book will walk you through all the stages of requirements, architecture, component selection, schematics, layout, and FPGA / software design. We designed and manufactured the board at the heart of the book! The schematics and layout are available in Altium here Learn more about the board (see previous blogs on Bring up, DDR validation, USB, Sensors) and view the schematics here.
Sponsored by AMD


