MicroZed Chronicles: Two Ways to Secure Ethernet Traffic on the Spartan UltraScale+
Security is becoming increasingly important in many of the FPGA applications we develop, several talks at the recent FPGA Horizons London focused on this.
Whether we are working on communications, industrial, automotive or space systems, our devices are increasingly connected, and the world in which they are deployed is a much more hostile place than it once was, as demonstrated over the last week with several cyber attacks on established frameworks.
Of course, it is not just the threat landscape which is changing, regulation is changing as well, in the EU, the Cyber Resilience Act entered into force in December 2024, with its vulnerability reporting obligations applying from this month (September 2026) and the main obligations following in December 2027.

This means that for products with digital elements placed on the EU market, security can no longer be an afterthought bolted on at the end of development if at all. It must be considered from the very start of the design, and as engineers we need to understand the security capabilities our devices provide and how to best make use of them.
FPGA are very good at implementing secure solutions, as they provide us with the flexibility to implement secure solutions in the way which best fits our application. Throughout my career I have implemented several high grade cryptographic solutions using FPGAs.
We can, of course, implement our security features in the programmable logic, creating exactly the cryptographic algorithm we desire for the application. However, it is often overlooked that our devices also contain hardened security features, which are used as part of the configuration and boot process to support capabilities such as encrypted and authenticated bitstreams.
In many devices, these same hardened engines can also be leveraged by our application at run time. The Spartan UltraScale+ is a great example of this, with the larger devices being design for the post quantum security world. In the Spartan UltraScale+ we will find hardened security engines live in the Platform Management Controller (PMC) which includes AES-GCM, SHA-3 and a TRNG capability.
All of which can be accessed from the fabric at run time, this means we have two ways to implement security on the same device.
This of course raises the question, which approach should we use in our design, and what does each one cost us? The answer like many engineering questions is it depends, it depends on your requirements and application. For some the implementation in the PL is the way to go, for others leveraging the PMC security features is the best solution.
But it never hurts to understand how to do both and what the solution looks like in terms of logic requirements.
So, I created a demonstration application for the SCU200 evaluation platform which runs both implementations live on the same board.
In the remainder of this blog, we are going to look at the architecture of the design, how to get it up and running on the SCU200, and of course the results.
Project Overview
The demonstration implements a single-port Ethernet endpoint on the SCU200. UDP frames are received on GEM0, the payload of each frame is encrypted using AES-256-GCM, and the authenticated response is returned on the same wire at 1 Gb/s.
What makes this interesting is there is no processor anywhere in the datapath, no MicroBlaze, no ARP and no TCP/IP stack. The packet is simply rebuilt with the endpoints swapped and transmitted back to the host.
The entire project is reproducible from TCL using Vivado 2026.1 also provided in the repository is a self-checking Questa regression, along with Python host tools which verify every packet against an independent software oracle.
Packet Path Architecture
Let's take a look at the datapath first, the packet path is a streaming pipeline, with every stage connected using AXI-Stream with full handshaking:
Ethernet RX (GEM0) → UDP Parser → AES-256-GCM → Packet Rebuild → Ethernet TX

The parser validates the incoming frame and strips off the clear header. The crypto engine then encrypts the payload and generates a 128-bit authentication tag, before the rebuild stage corrects the lengths and checksums ready for transmission.
The wire format is worth examining a little closer. Each secured frame contains the standard Ethernet (14 bytes), IPv4 (20 bytes) and UDP (8 bytes) headers, followed by a 16-byte secure header, the ciphertext and the 16-byte GCM tag.
The secure header contains the version, flags, sequence number and IV salt. While this header is transmitted in the clear, it travels as Additional Authenticated Data (AAD), which means it is authenticated on every packet, any tampering with the header will fail the tag check.
Dual Crypto Engines
Each packet is routed to one of the two AES-GCM engines purely by the UDP destination port. Traffic sent to port 4000 is handled by the streaming programmable logic implementation, while traffic to port 4001 is routed through the hardened PMC engine.
There are no register writes and no software required to switch between the two paths. The selected path is also echoed in the authenticated header, which means the host is able to prove which engine generated each reply.
The PL path implements a fully pipelined AES-256-GCM which processes one 128-bit block per clock. This means the encryption keeps pace with the wire. The implementation has been verified against the NIST known-answer vectors.
The PMC path uses the same key, IV scheme and wire format, however, in this case, the packet is encrypted using the hardened AES-GCM engine, which is accessed using the PMC Bridge.
The PMC Bridge exposes the hardened security engines to the fabric as an AXI-mapped slave. As we want to process the packets as fast as possible, I developed a solution which is pure RTL, there is no MicroBlaze etc in the design. This sequences the full key load, stream switch, DMA and AES operation, which are the same features used by XilSecure, however, it is implemented in RTL.
Getting Up and Running
If you have a SCU200 or similar board, e.g. SCU35 you can access the design on my repo.
One of my goals for this project was to make it easy to get up and running.
To recreate the demonstration, along with the SCU200 board itself, we need an Ethernet cable connected to GEM0 (either directly or via a switch), a laptop Ethernet port or USB gigabit adapter, a USB micro cable for JTAG, and Vivado 2026.1 with the SCU200 board definition installed.
On the host side, we need Windows PowerShell, Python 3.10 or later, and Npcap. Everything else is provided in the repository.
Once we have gathered these together, it is five simple steps from clone to live traffic:
1. Clone the repository: git clone https://bitbucket.org/adiuvo-engineering/scu200_security.git
2. Install the host tools: python -m pip install -r .\host\requirements.txt
3. Set a static IP of 192.0.2.1/24 on the host adapter. No gateway is needed, the board answers at 192.0.2.2 with no ARP required.
4. Program the board: .\scripts\program_board.ps1
5. Launch the dashboard: .\scripts\start_dashboard.ps1 -Interface "<your adapter>"
The checked-in, hardware-tested image programs straight away, so there is no need to rebuild the project first.
Live Hardware Dashboard
With the board programmed, the dashboard opens at localhost:8765. A single button programs the dual image, waits for the gigabit link to negotiate, runs authenticated echo traffic down both paths and fetches the encrypted hardware counters. Every control on the dashboard maps to a JSON endpoint, which means the whole flow can be scripted if desired.

Measured Performance
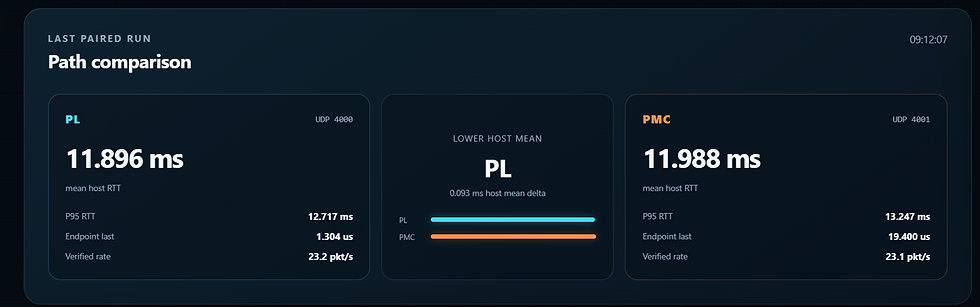
Running both engines back to back over the same wire in a single paired run, with 500 packets per path and 100% verified, gives us some very interesting numbers.
At the host, the two paths appear indistinguishable, but there is a lot more to it than that.
The PL path shows a mean round trip of 11.896 ms against 11.988 ms for the PMC path, a difference of less than 0.1 ms. This difference is well below the jitter introduced by the Windows, Npcap and USB host stack. If we only measured at the host, we might conclude the two implementations perform identically.
However, the hardware-timed endpoint latency tells the real story, the streaming PL engine turns a packet around in 1.304 µs, which is approximately 163 cycles at 125 MHz. The PMC path takes 19.4 µs, approximately 2,397 cycles, making it 14.7 times slower per packet.
What is important to understand here is that this overhead is not the hardened AES engine itself.
The PMC path is a transaction-based service, we must buffer the packet, cross the bridge, program the AES and DMA registers, transfer the key, IV, AAD and payload, wait for completion, and then read back and rebuild the packet.
It is the bridge crossing, register programming and store-and-forward buffering which dominate the latency, not the encryption.
The PL path has headroom for approximately 767k packets per second, while the PMC path supports approximately 52k packets per second. For one-at-a-time echo traffic the difference is invisible, however, under sustained back-to-back load it is not.
Every response from both engines is checked against an independent software AES-256-GCM process, verifying the payload hash, ciphertext hash and authentication tag byte for byte.
Across the run, both engines achieved 500 exact matches from 500 packets, this proves the hardened PMC engine and the PL pipeline produce identical, correct cryptography.
The proof here is packet-level and live, captured from real hardware traffic and not simulation.

One subtlety to be aware of is that live PL and PMC packets differ on the wire by design, as the sequence-derived IVs and the authenticated path flag change the AAD. As such, each response is verified against its own independent computation.
Trading Speed for Silicon Efficiency
At this point you might be wondering, if the PL path is 15 times faster, why would we ever use the hardened engine? The answer of course is resources.

The streaming PL AES-GCM hierarchy requires 31,618 LUTs, 4,227 flip-flops and 126 RAMB18s.
The complete PMC path wrapper, which includes the full AES-GCM sequencer, both 2,048-byte staging buffers in block RAM, the bridge AXI controller and the register sequencer, requires just 707 LUTs, 379 flip-flops and 2 RAMB18s.
This represents a 97.8% reduction in LUTs, which is possible because the AES computation itself is performed in fixed, hardened silicon and consumes no fabric at all. However, your throughput is greatly reduced.
Moving to the PMC path therefore reclaims approximately 30,900 LUTs and 3,850 flip-flops for our own application logic. A PMC-only product variant could remove the entire PL AES hierarchy.
The guidance which falls out of these measurements is straightforward, use the streaming PL implementation when the application needs sustained line-rate processing and microsecond-class latency, with data never leaving the programmable logic. Use the hardened PMC engine when conserving fabric matters more than minimum latency, or when a fixed silicon security boundary is attractive for the application.
The great thing about the Spartan UltraScale+ is that both options are available on the same device, and as this demonstration shows, both are easy to do.
In a future blog, we will dive deeper into the RTL AXI master which drives the PMC Bridge, and look at exactly how we sequence the hardened security engines without a processor.
FPGA Journal
Read about cutting edge FPGA developments, in the FPGA Horizons Journal or contribute an article.
Workshops and Webinars:
If you enjoyed the blog why not take a look at the free webinars, workshops and training courses we have created over the years. Highlights include:
Upcoming Webinars Timing, RTL Creation, FPGA Math and Mixed Signal
Professional PYNQ Learn how to use PYNQ in your developments
Introduction to Vivado learn how to use AMD Vivado
Ultra96, MiniZed & ZU1 three day course looking at HW, SW and PetaLinux
Arty Z7-20 Class looking at HW, SW and PetaLinux
Mastering MicroBlaze learn how to create MicroBlaze solutions
HLS Hero Workshop learn how to create High Level Synthesis based solutions
Perfecting Petalinux learn how to create and work with PetaLinux OS
Boards
Get an Adiuvo development board:
Adiuvo Embedded System Development board - Embedded System Development Board
Adiuvo Embedded System Tile - Low Risk way to add a FPGA to your design.
SpaceWire CODEC - SpaceWire CODEC, digital download, AXIS Interfaces
SpaceWire RMAP Initiator - SpaceWire RMAP Initiator, digital download, AXIS & AXI4 Interfaces
SpaceWire RMAP Target - SpaceWire Target, digital download, AXI4 and AXIS Interfaces
Embedded System Book
Do you want to know more about designing embedded systems from scratch? Check out our book on creating embedded systems. This book will walk you through all the stages of requirements, architecture, component selection, schematics, layout, and FPGA / software design. We designed and manufactured the board at the heart of the book! The schematics and layout are available in Altium here. Learn more about the board (see previous blogs on Bring up, DDR validation, USB, Sensors) and view the schematics here.
All words in this blog were written by a human.