
How to Install Vitis
- Sep 1, 2020
- 3 min read
Updated: Jun 27, 2025
I've had the pleasure of teaching several workshops over the last few years to spread the gospel of FPGA and embedded systems. It is my passion and I'm always thrilled to share it and help others in any way I can. As fun as these workshops (and developing FPGAs overall) can be, I've noticed that one of the biggest hurdles for people is the the initial software / tools downloads.
Many of my past project tutorials and blogs cover how to use tools such as Vivado and Vitis, but in preparation for an upcoming workshop, Building Accelerated Applications with Vitis, I wanted to break down how to install Vitis step-by-step. May this post help not only those workshop participants, but many of you out there who have been stuck on getting started with Vitis!
Requirements for Installing Vitis
Linux machine or virtual machine using the following Linux 64-bit operating systems
RHEL/CentOS 7.4, 7.5, and 7.6
Ubuntu 16.04.5 LTS, 16.04.6 LTS, 18.04.1 LTS, 18.04.2 LTS
Amazon Linux 2 AL2 LTS
At least 32GB of system memory and 100 GB of hard disk space, along with an internet connection.
A Xilinx account to do the download
Once you have checked off the requirements, you are ready to begin installing Vitis.
Step-by-Step Instructions
1. Download Vitis 2020.1 from the Xilinx website.
2. Set the properties of the Vitis download to allow executing as program

3. Install the Vitis software using the root privileges with the command:
sudo./Xilinx_unified_2020.1_0602_1208_Lin64.bin 4. Once the Vitis Installation is complete Vitis will be available under the directory
/tools/xilinx
5. The next step is to download the Xilinx RunTime from the Xilinx website. Please make sure you get the correct embedded (ZCU104 / Ultra96) or cloud (Alveo) XRT. Also make sure it is the correct XRT for your operating system.
6. Download your platform from the links below:
7. Prior to installing the Xilinx RunTime we need to install the following packages by running the commands:
sudo apt-get install ocl-icd-libopencl1

sudo apt-get install opencl-headers

sudo apt-get install ocl-icd-opencl-dev
8. Install the Xilinx RunTime using the command:
sudo apt install ./xrt_202010.2.6.655_18.04-amd64-xrt.deb9. Using a terminal window in the opt/xilinx directory make a directory called platforms with the command:
sudo mkdir platforms
10. Copy the downloaded platform file from the downloads directory into the newly created /opt/xilinx/platforms directory – if the terminal PWD (present working directory) is downloads the command is:
sudo cp xilinx_zcu104_base_202010_1.zip /opt/xilinx/platformsIn this example, I have used the ZCU104, but you should see the platform you downloaded.
11. In the platforms directory unzip the compressed file using the command:
sudo unzip -g xilinx_zcu104_base_202010_1.zip (This might take a few minutes)
12. Download the ZynqMP common image from the Xilinx website.
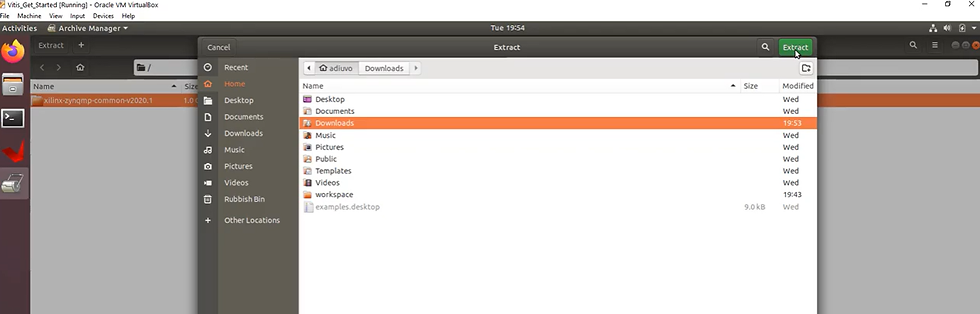
13. Extract the downloaded ZynqMP common image into a directory

14. In a file browser open the location of the extracted ZynqMP common image files
15. Select the file rootfs.ext4.gz and extract this file into the same directory
16. Open a terminal window in the extracted ZynqMP common image directory and generate the SDK using the command:
sudo ./sdk.sh
17. Select the desired directory for the SYSROOT

18. In a terminal window navigate to tools/Xilinx/Vitis/2020.1 and run the settings64.sh command:
source settings64.sh 19. In the same terminal window as the setting script was source enter the command:
Vitis
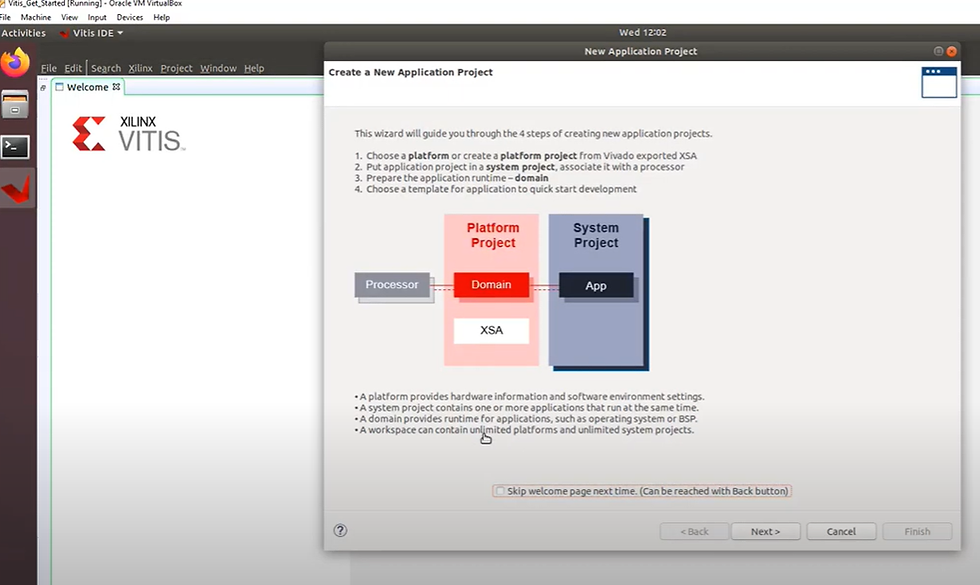
20. This will open the Vitis IDE. As part of the loading process it will ask you the workspace you wish to work in. Select the directory you wish to use as your workspace.

21. Once Vitis opens select Create Application Project

22. When the new project dialog appears click on Next
23. On the platform dialog you should see the platform you have just installed

Congratulations! You now have Vitis and an acceleration capable platform installed and are ready to begin your development journey.


